Step-by-Step Guide to Headless Experience Layer (HXL)
Introduction
Picture a sales rep two minutes before a customer call. She asks Claude, “Get Account Info Global Media.” The answer comes back from Salesforce, and it's correct. It's also a block of text she has to read line by line to find the revenue figure.
The data was never the problem. Your custom MCP server already returns the right fields. What's missing is the presentation. And nobody wants to build one UI for Claude, another for Slack and a third for Agentforce. That's how weekends disappear.
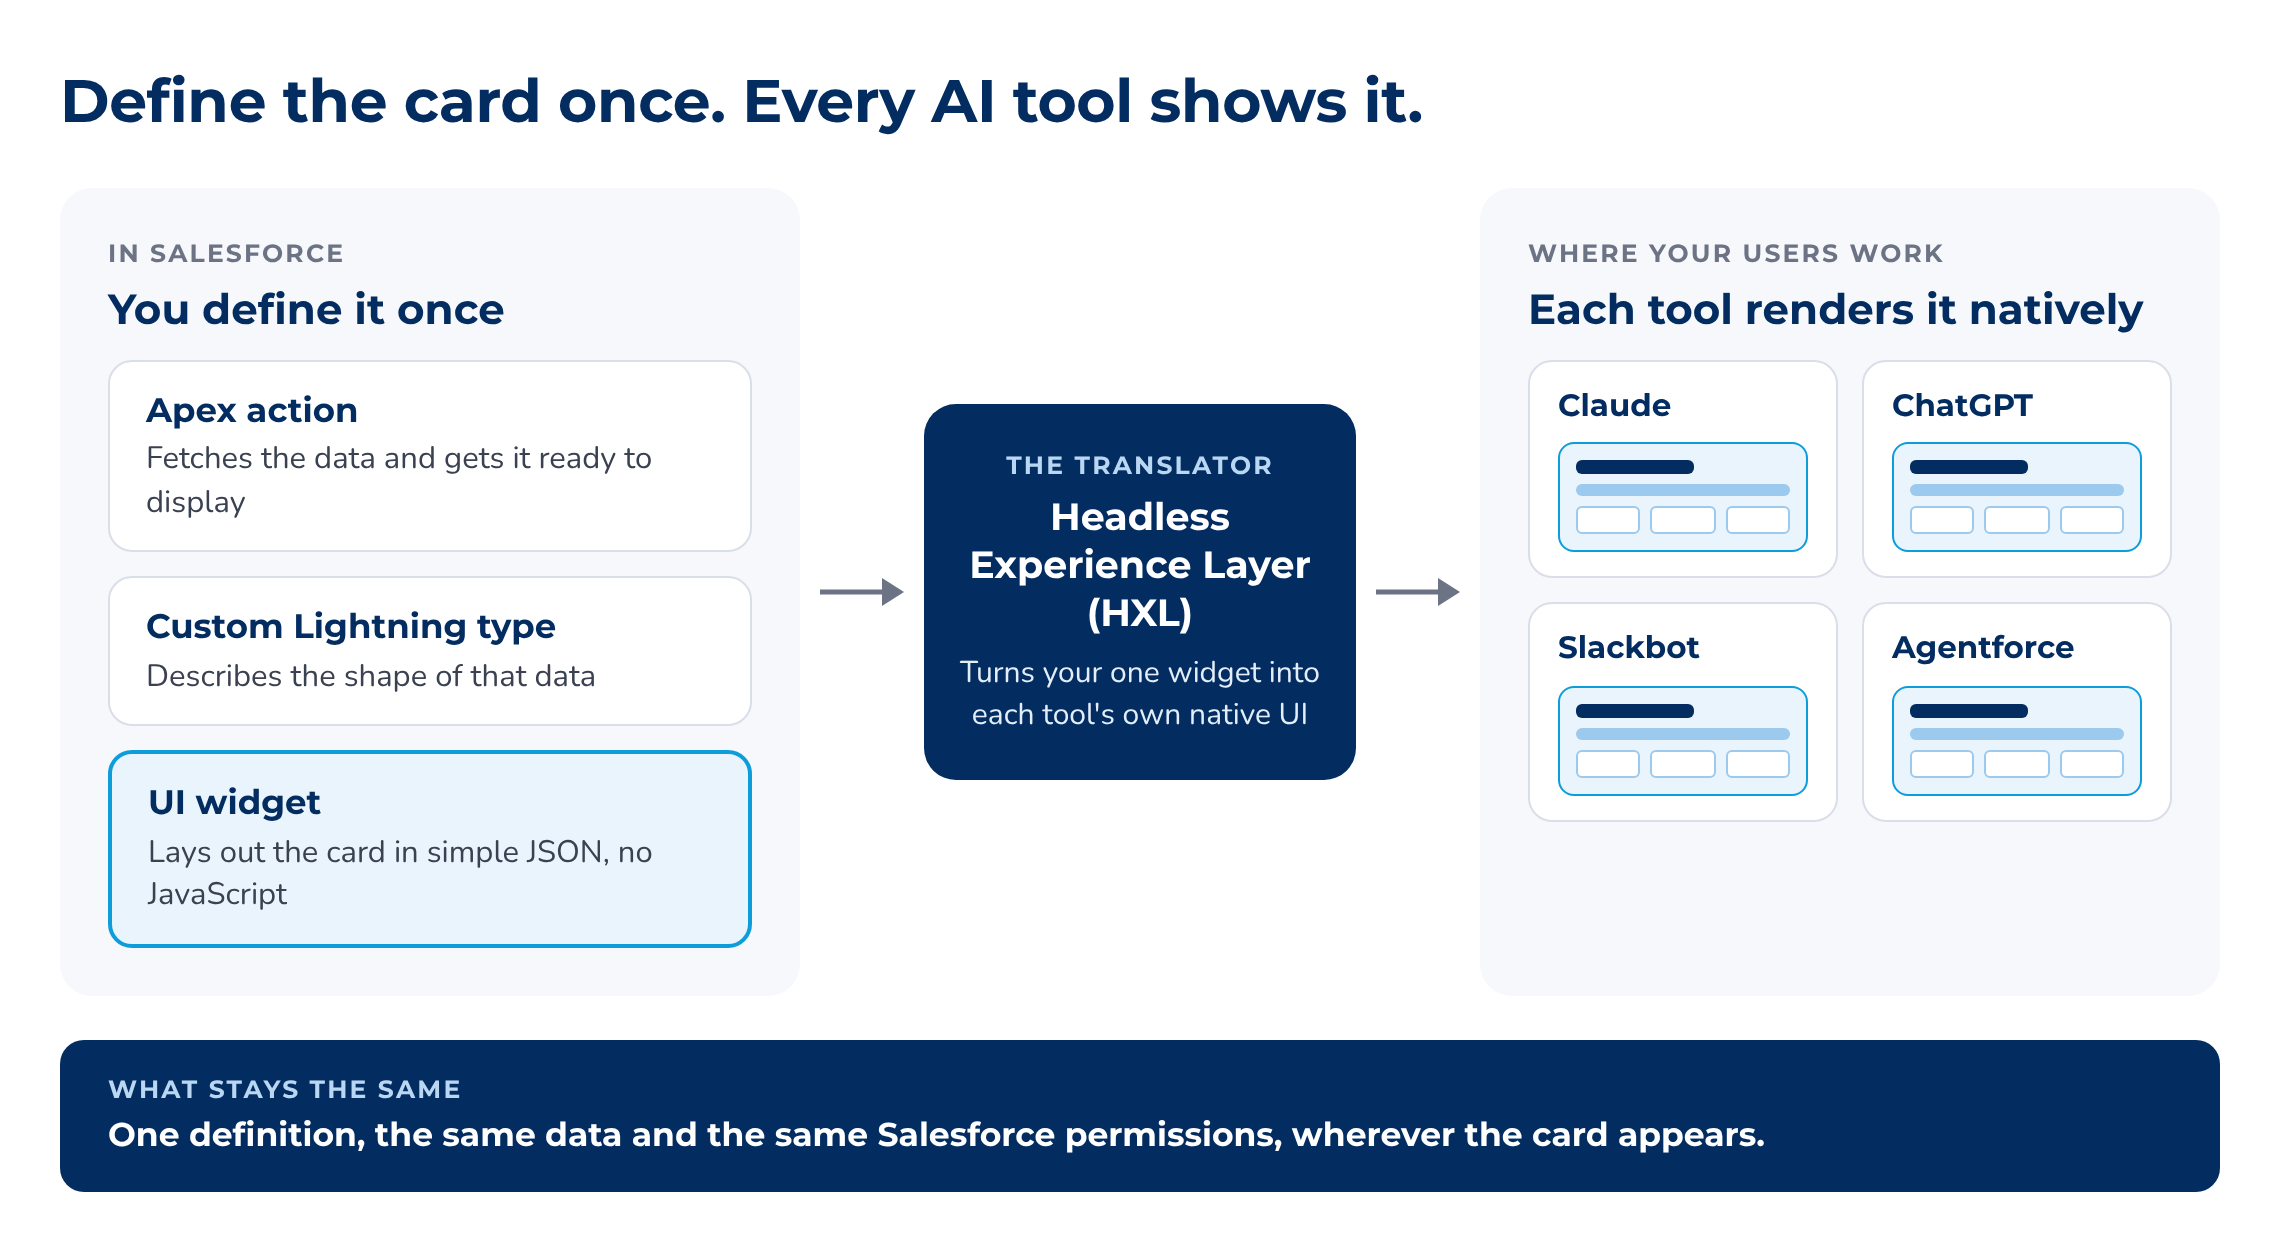
This is the gap the Headless Experience Layer (HXL) fills. You define the card once in Salesforce, and AI tools like Claude render it right in the chat.
In this post, you'll learn what HXL is, why it's useful and how the pieces fit together. It starts with a two-minute video that gives you the short version. The embedded step-by-step guide at the end then walks you through building an account card end to end, from enabling HXL to seeing the card in Claude.
Watch: HXL explained in two minutes
Short on time? This video shows the same question answered with and without HXL, follows one request from Claude to the finished card, and opens the three files behind it.
headless-experience-layer-hxl-explained.mp4The rest of this post covers the same ground in more detail, and the step-by-step guide at the end shows you how to build it yourself.
What is the Headless Experience Layer?
Salesforce describes HXL as an experience engine that lets you write a piece of UI once and run it anywhere. In everyday terms, it's a translator. You describe a piece of UI once, called a widget, and each AI tool draws it in its own native style.
A widget is a small JSON file built from ready-made components such as text, badges, rows, columns, links and buttons. There's no JavaScript to write. A custom Lightning type, which is Salesforce's way of describing the shape of a piece of data, connects the widget to the output of your Apex action.
Widgets render in Agentforce, ChatGPT, Claude and Slackbot. For the tools outside Salesforce, the card travels through a custom MCP server. If MCP servers are new to you, start with the Step-by-Step Guide to Setting Up Standard MCP Server in Salesforce, then the Step-by-Step Guide To Creating Custom MCP Server in Salesforce. This build sits on top of both.
HXL is one part of Salesforce Headless 360, the move to open the platform to agents without a browser. My Dreamforce 2026 Developer Keynote takeaways show where HXL sits among the other announcements.
Here's a simple way to keep the pieces apart. MCP gives an agent its hands. HXL gives its answer a face.
Before and after: the same question, two answers
Here's the difference in one picture. Both answers come from the same custom MCP server, the same Apex class and the same account record.
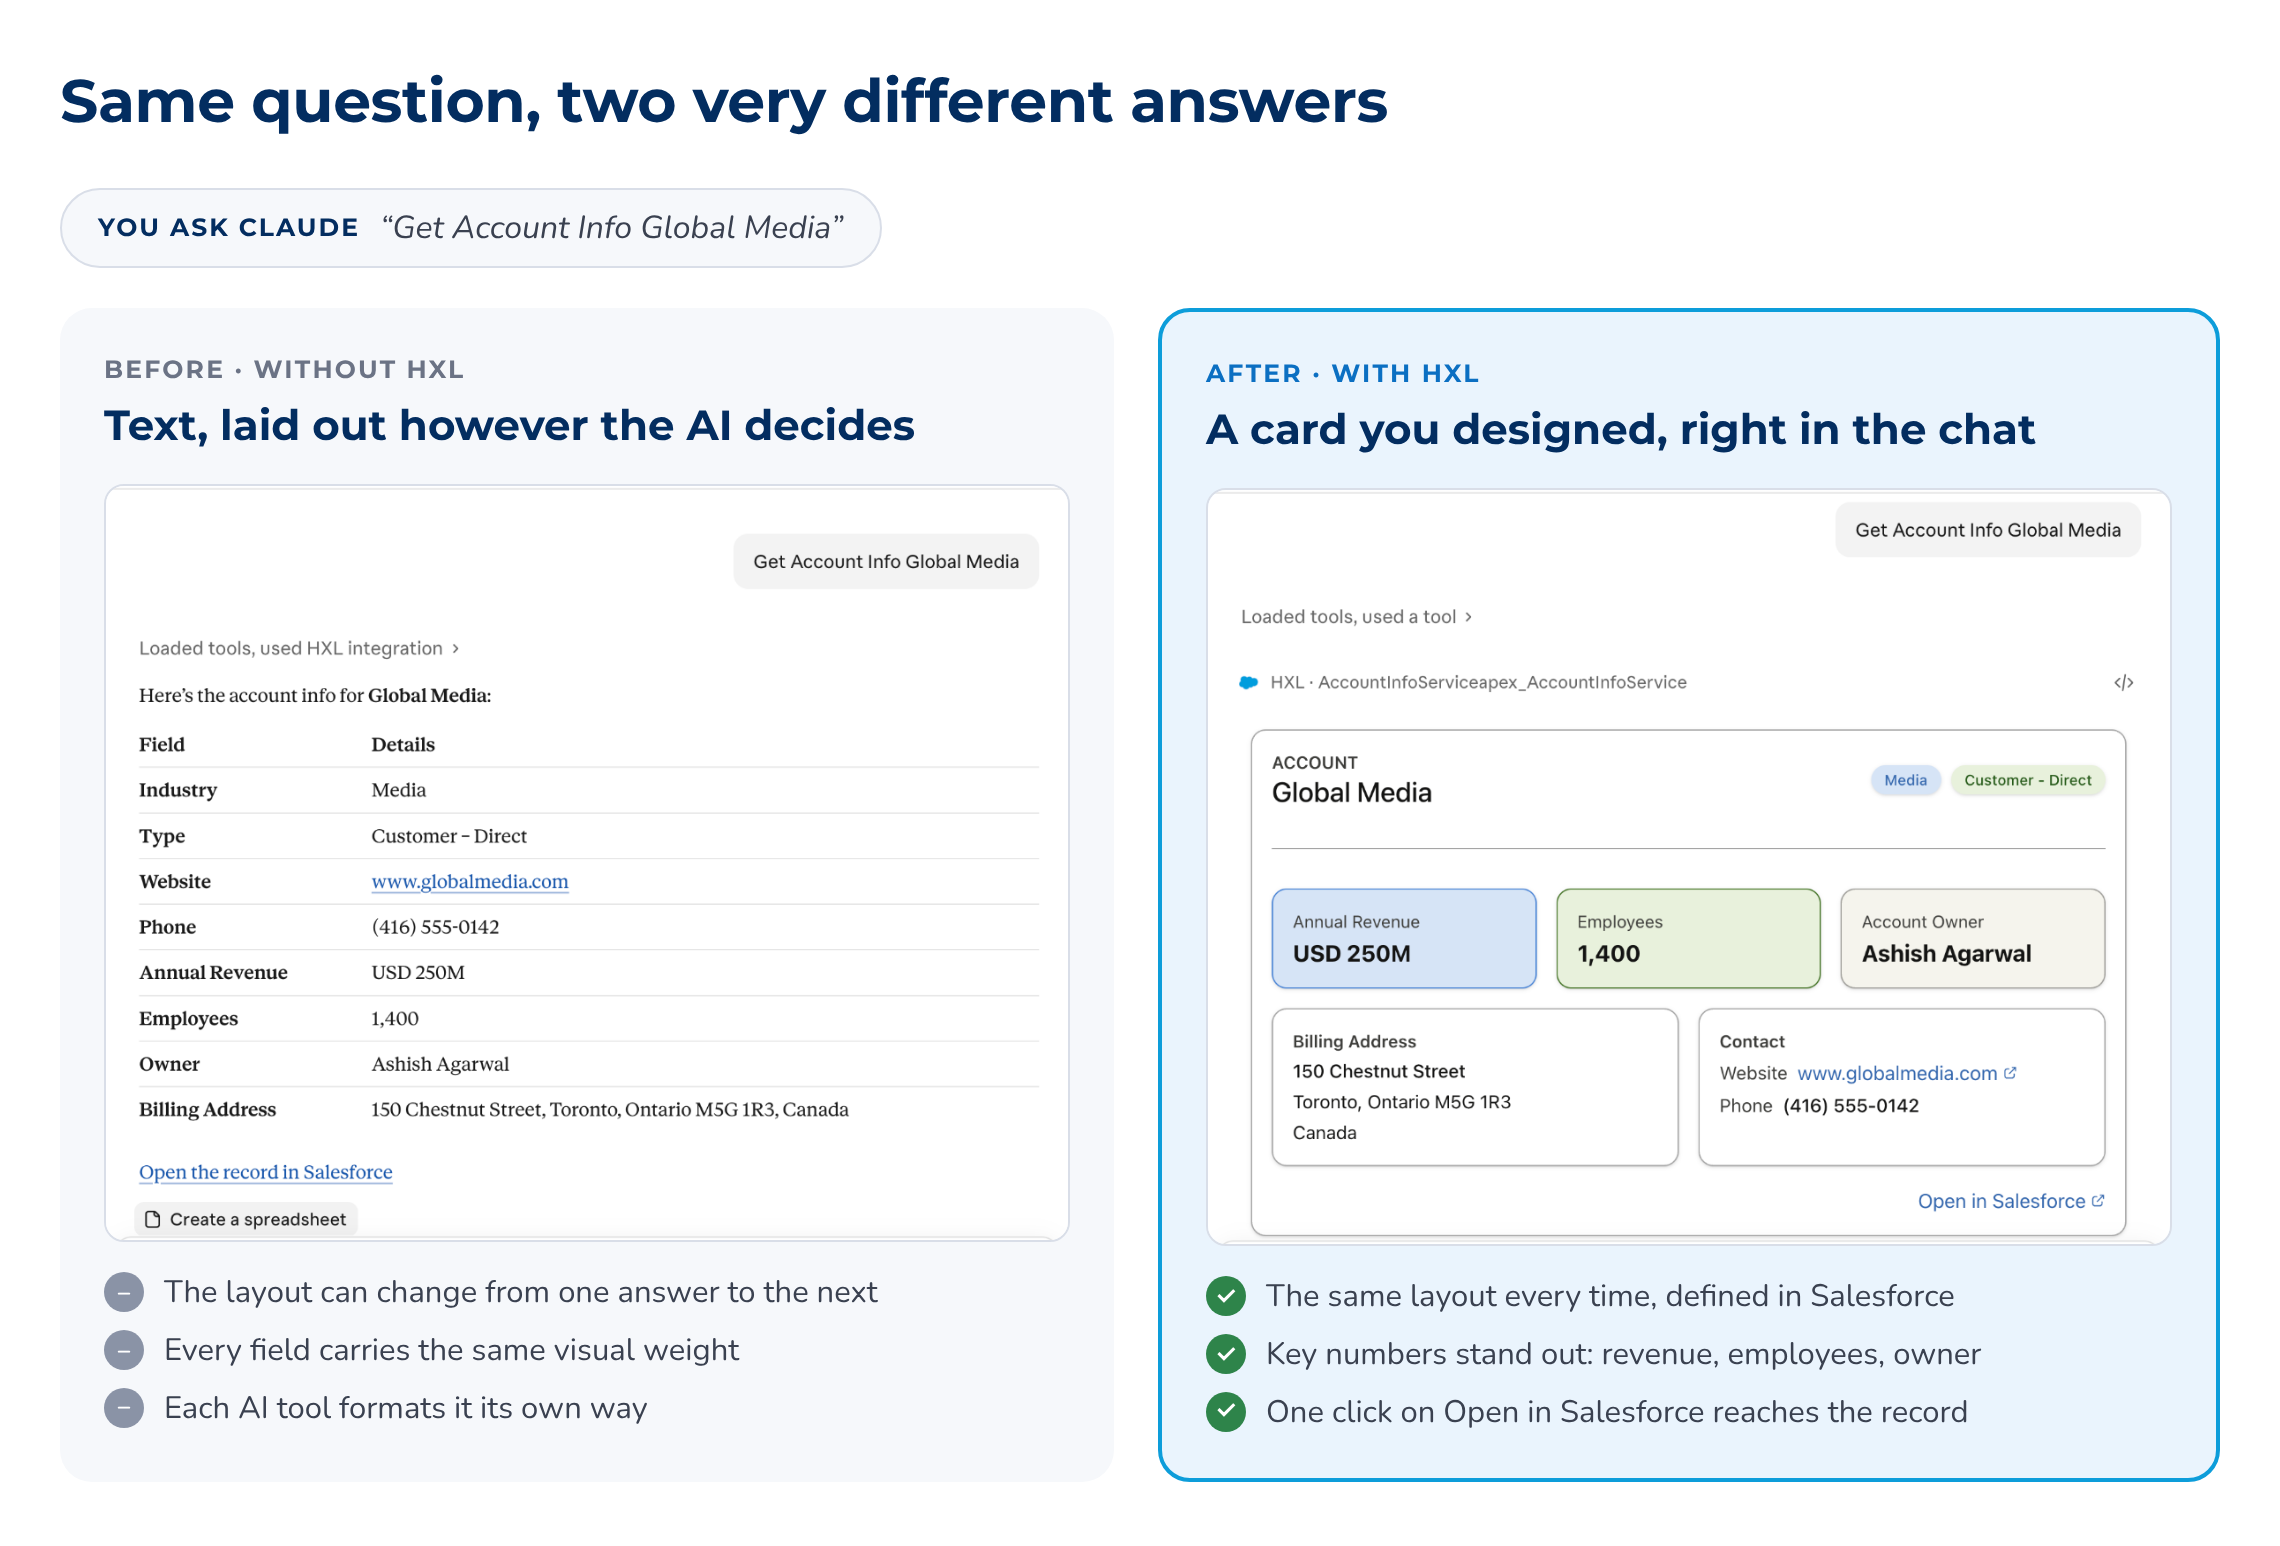
Before. Claude receives the account data and writes it up as text. It's accurate, but Claude decides the layout, and another AI tool would lay it out differently. Nothing tells the reader which numbers matter most.
After. The same data arrives with a card attached. The account name sits at the top, with industry and type as badges. Annual revenue, employees and account owner each get their own tile. Billing address and contact details sit below, and Open in Salesforce takes the user straight to the record.
Nothing changed in the data or in the permissions. You only added a description of how the answer should look.
Why HXL is useful
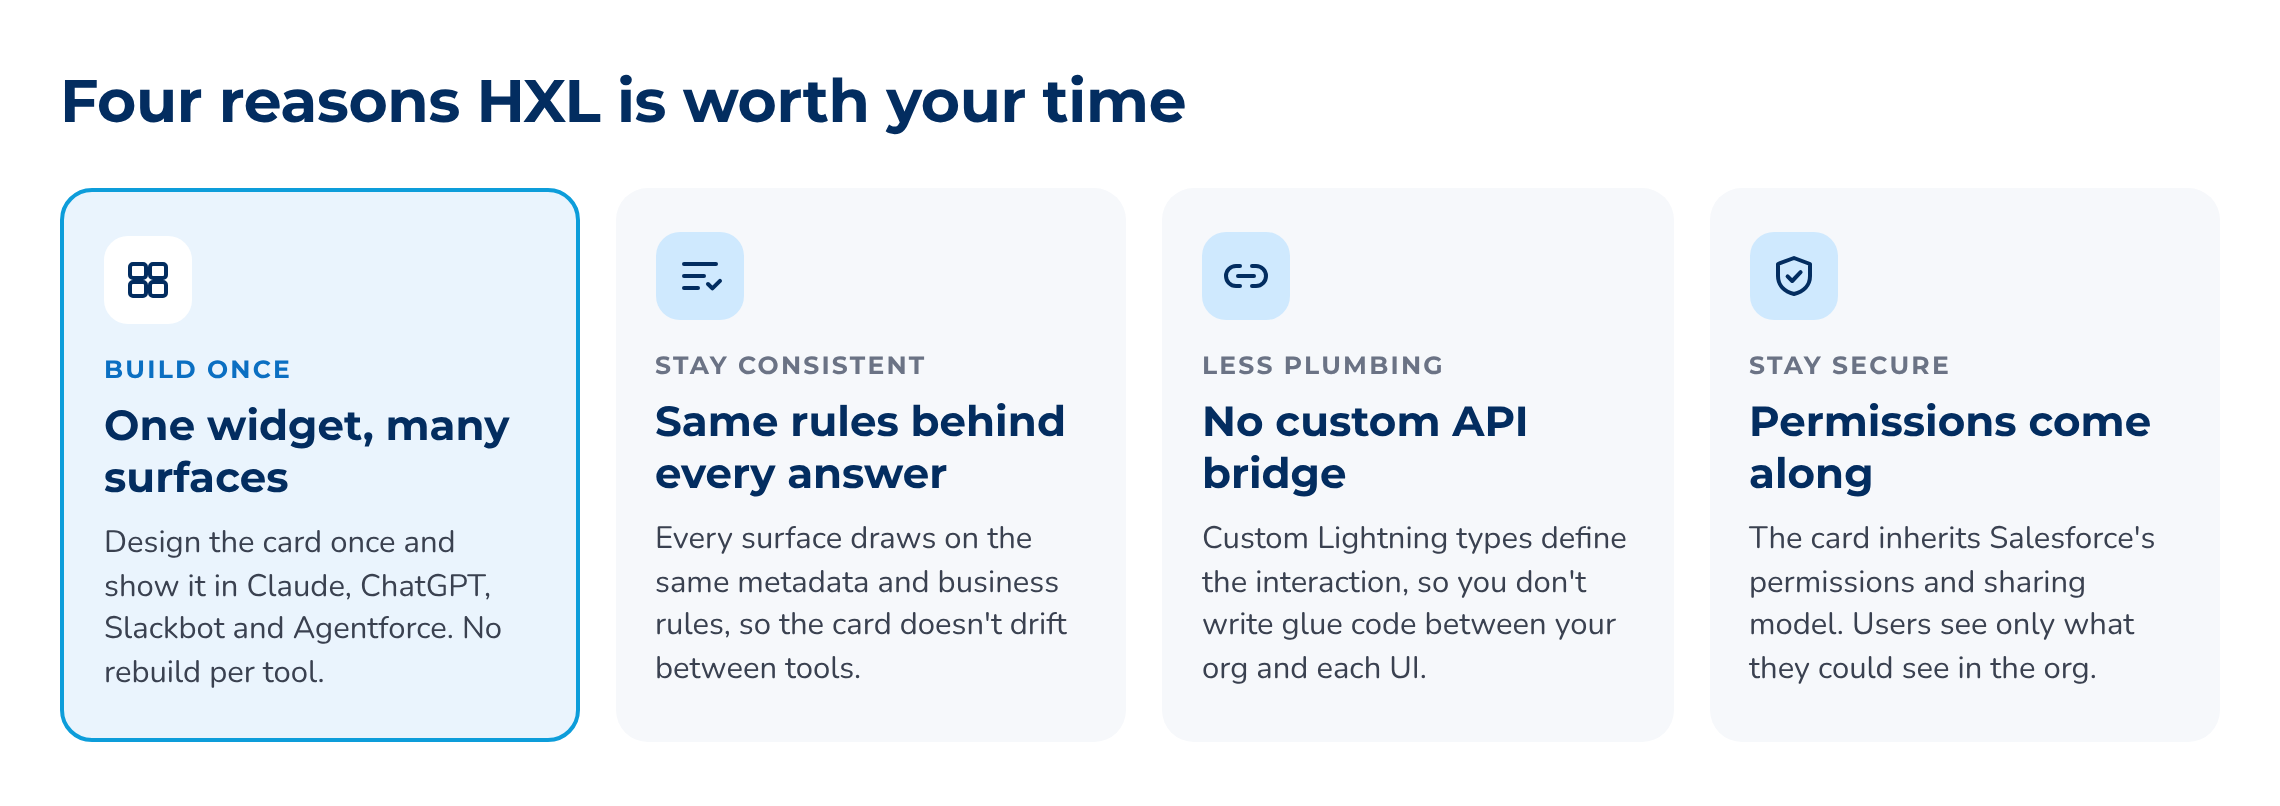
Salesforce lists four advantages for HXL. Each one maps to a real project headache.
Once the pattern clicks, the uses come quickly:
An account or customer card a rep can scan during a call.
A case summary for support agents who work in Slack all day.
An order or booking confirmation that looks the same in Agentforce and in Claude.
A pipeline snapshot a sales leader pulls up before a forecast meeting.
How HXL works
When a user asks a question, five things happen.
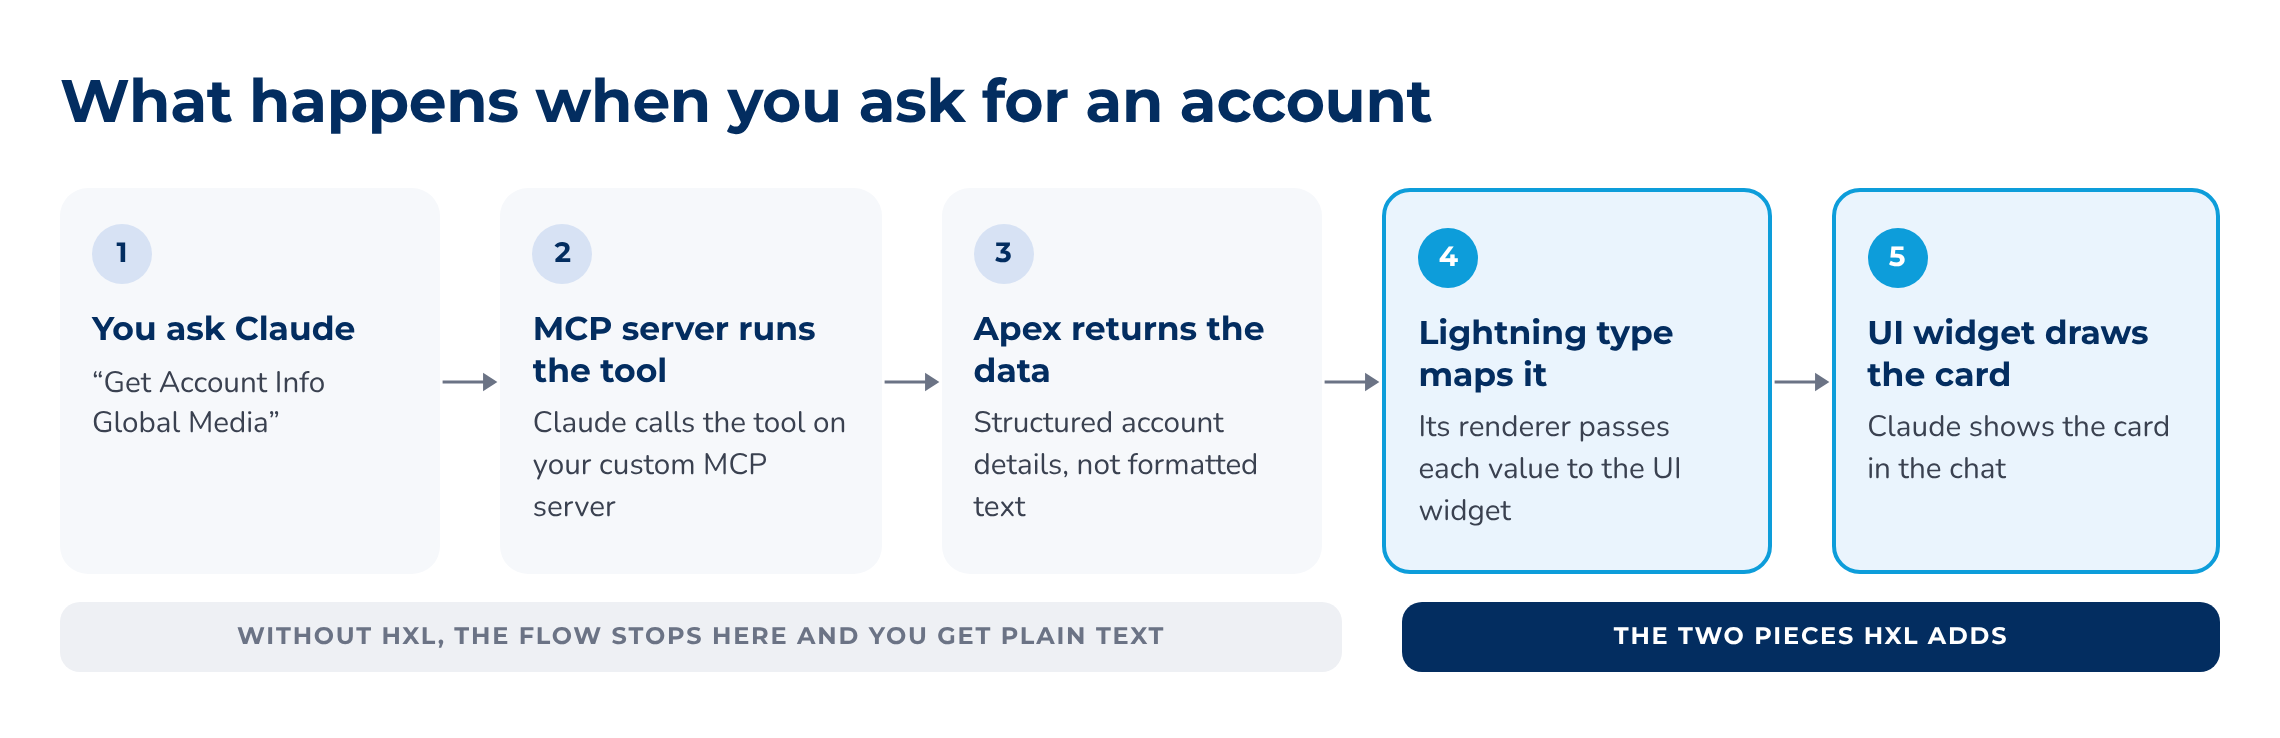
Steps 1 to 3 are an ordinary MCP tool call. Stop there, and the AI tool gets structured data and writes it up as text. Steps 4 and 5 are what you add with HXL: a Lightning type that maps the data, and a UI widget that draws it.
The building blocks
Every HXL build for an MCP client has the same four parts, and each has one job.
Apex invocable action. Fetches the records and prepares display-ready values, such as “USD 250M”. Widgets can use formulas for simple calculations, but business logic and formatting belong here. If invocable Apex is new to you, the Step-by-Step Guide to Creating Custom Action for Agent Using Apex covers the basics.
Custom Lightning types. Describe the shape of the data. An MCP client wraps the tool result in an envelope, so you need two types: one for the full result and one for the values inside it.
UI widget. A bundle of three small files: a schema that lists the attributes the card accepts, a JSON layout, and a metadata file.
MCP server definition. Attaches the card to the tool, so the AI tool knows there's a UI to show.
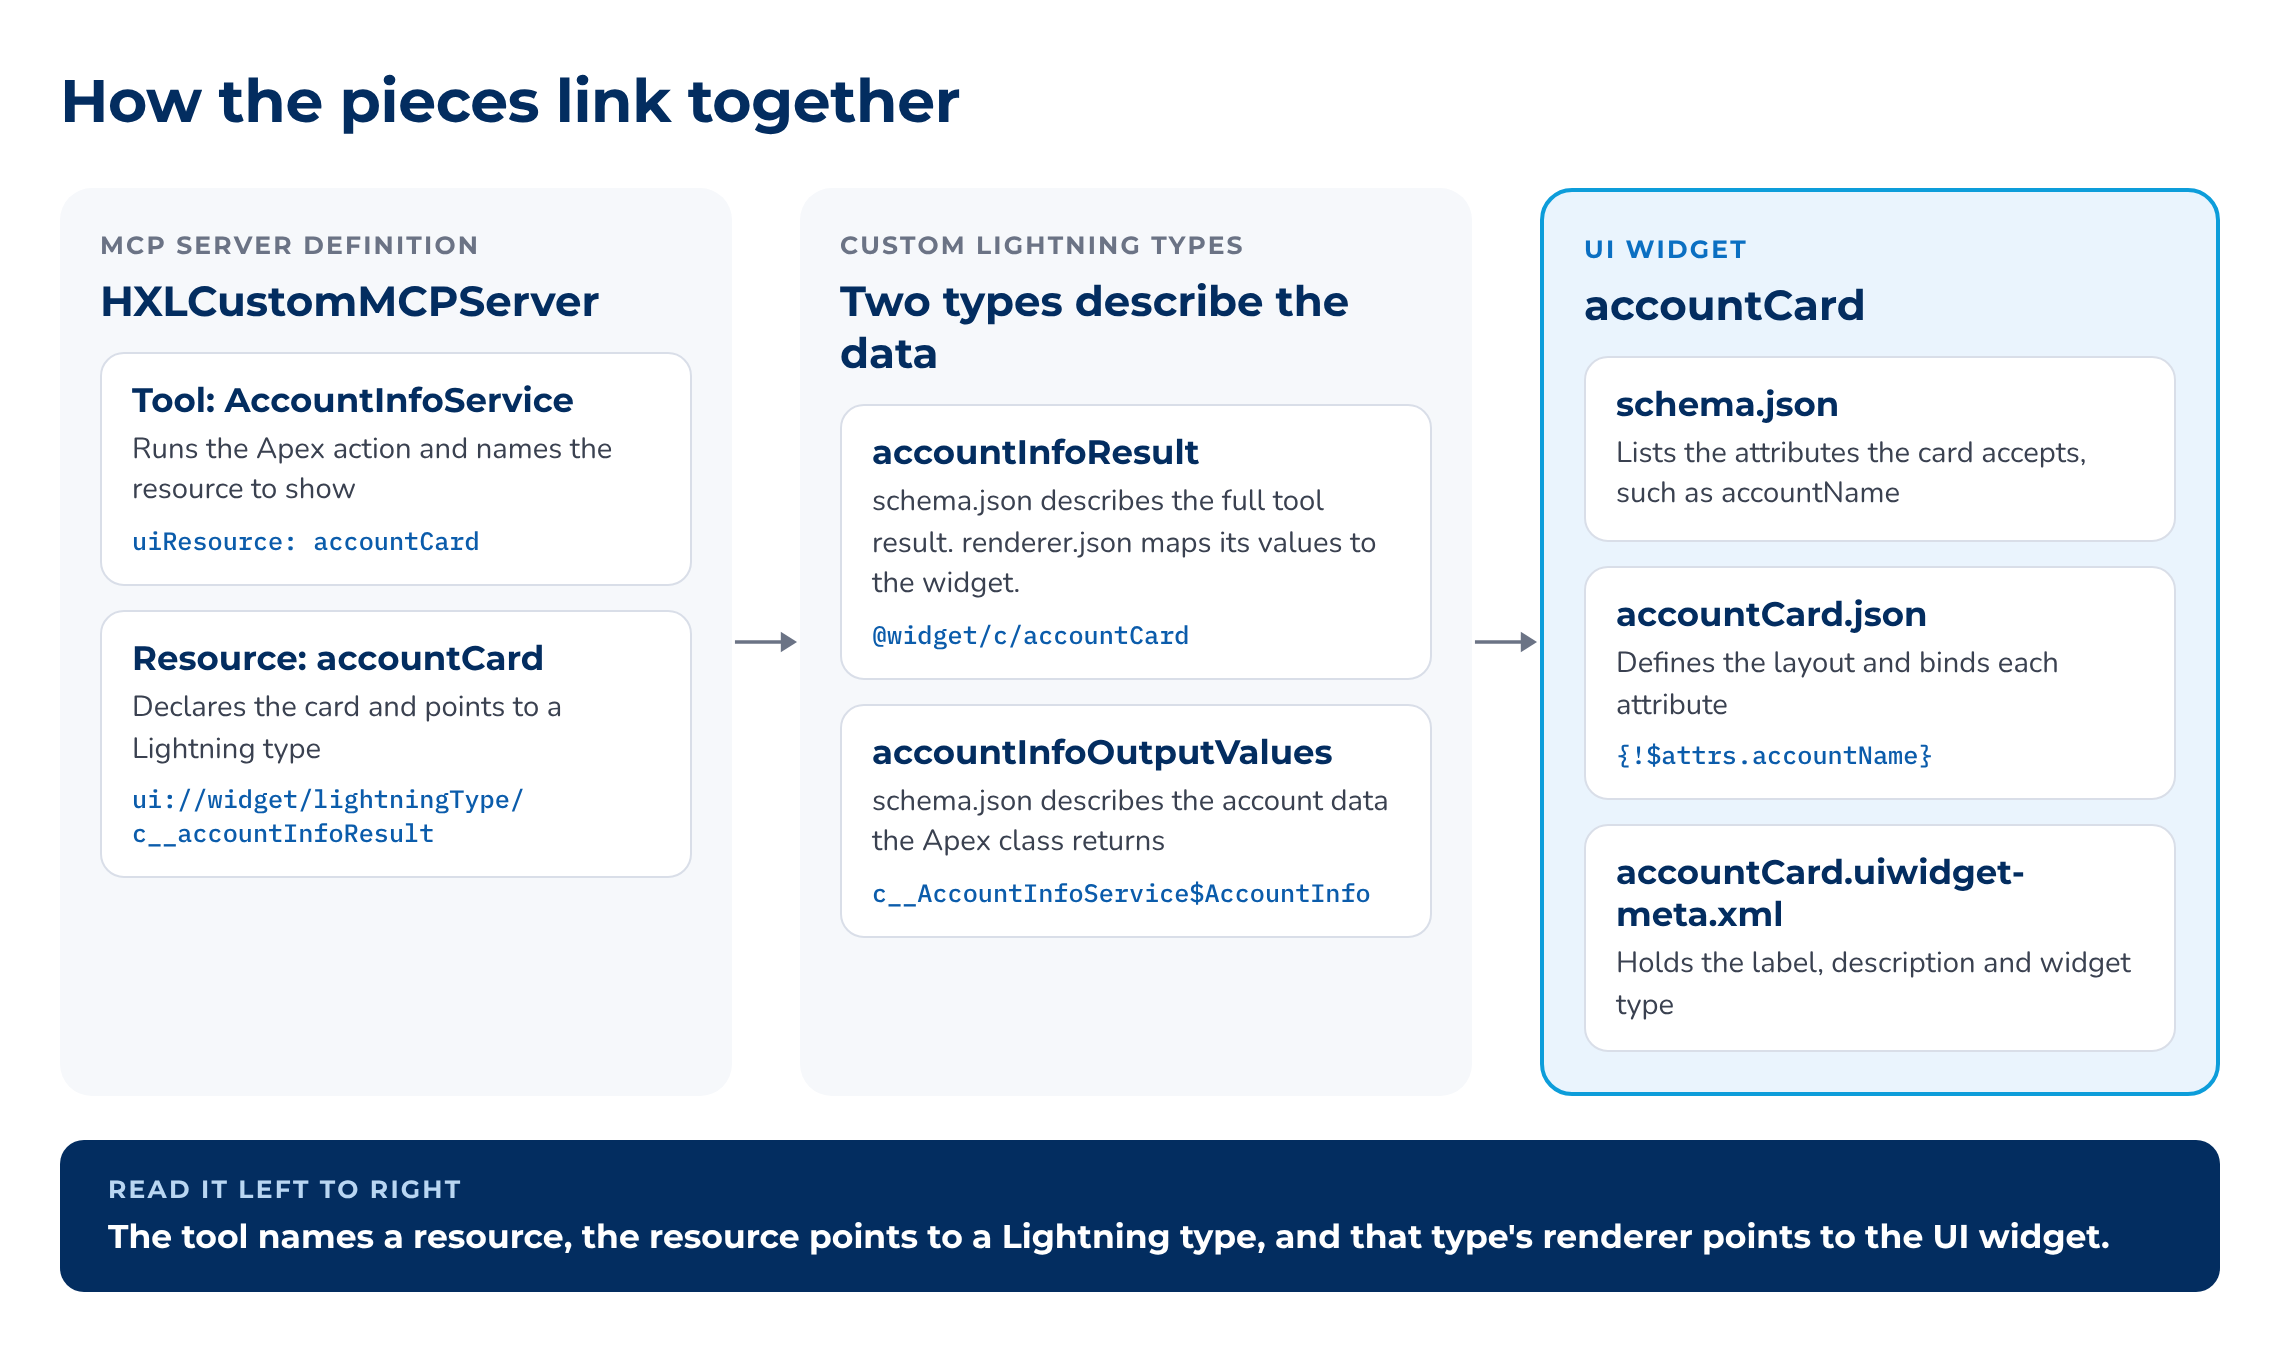
Follow the chain from left to right and the wiring makes sense. If a card ever fails to show, this is also the order to check things in.
HXL widget or Lightning web component?
If you've worked through the Step-by-Step Guide to Customizing Agentforce Response UI with Custom Lightning Types, you've already styled an agent's output with a Lightning web component (LWC). HXL doesn't replace that. It gives a Lightning type a second kind of renderer.
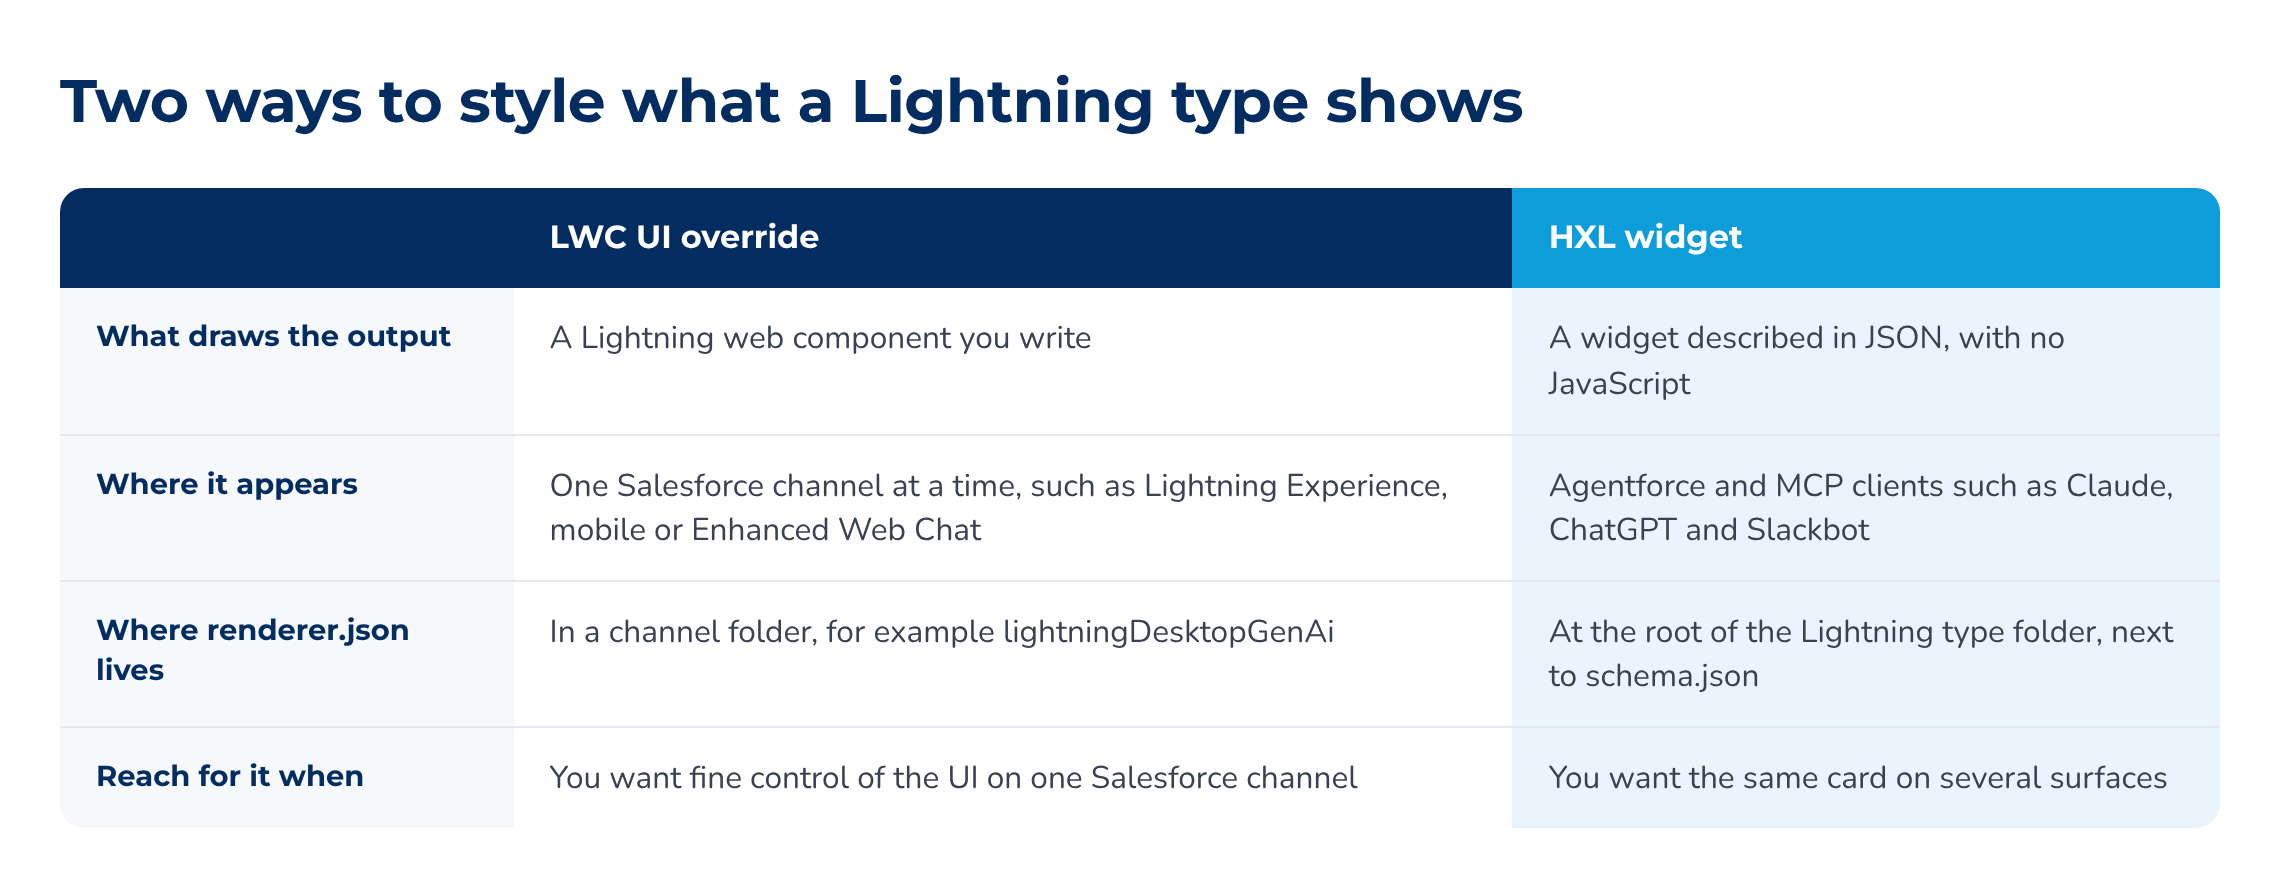
A quick rule of thumb: for one Salesforce channel where you want full control, use an LWC. For the same card in several tools, use an HXL widget. And if you need a whole app with pages and navigation rather than a card in a chat, that's a job for Multi-Framework, which the Step-by-Step Guide to Building React External App in Salesforce covers.
What to watch out for
Use API version 67.0 or later. Set it in sfdx-project.json before you start. UI widgets don't deploy on older versions.
You can't attach the card in Setup. The MCP Servers screen has no option for it yet. You download the server definition, add a few lines in VS Code and deploy it back.
The names must match exactly. The uiResource value on the tool has to equal the resource name. One typo and you're back to plain text, with no error to tell you why.
Refresh the tools list in Claude after you deploy. Until you do, Claude keeps using the old tool definition.
The AI tool decides when to show the card. A follow-up question may still come back as text, so don't design a process that depends on the card always appearing.
Surfaces differ in the details. Not every component attribute is supported everywhere, and Salesforce notes that HXL widgets don't render in Slackbot when Block Kit is in use. Check the component reference for the surfaces you care about.
Step-by-step guide overview
The full walkthrough, with a screenshot for every step, is in the embedded guide below. You'll build the account card shown above in nine stages.
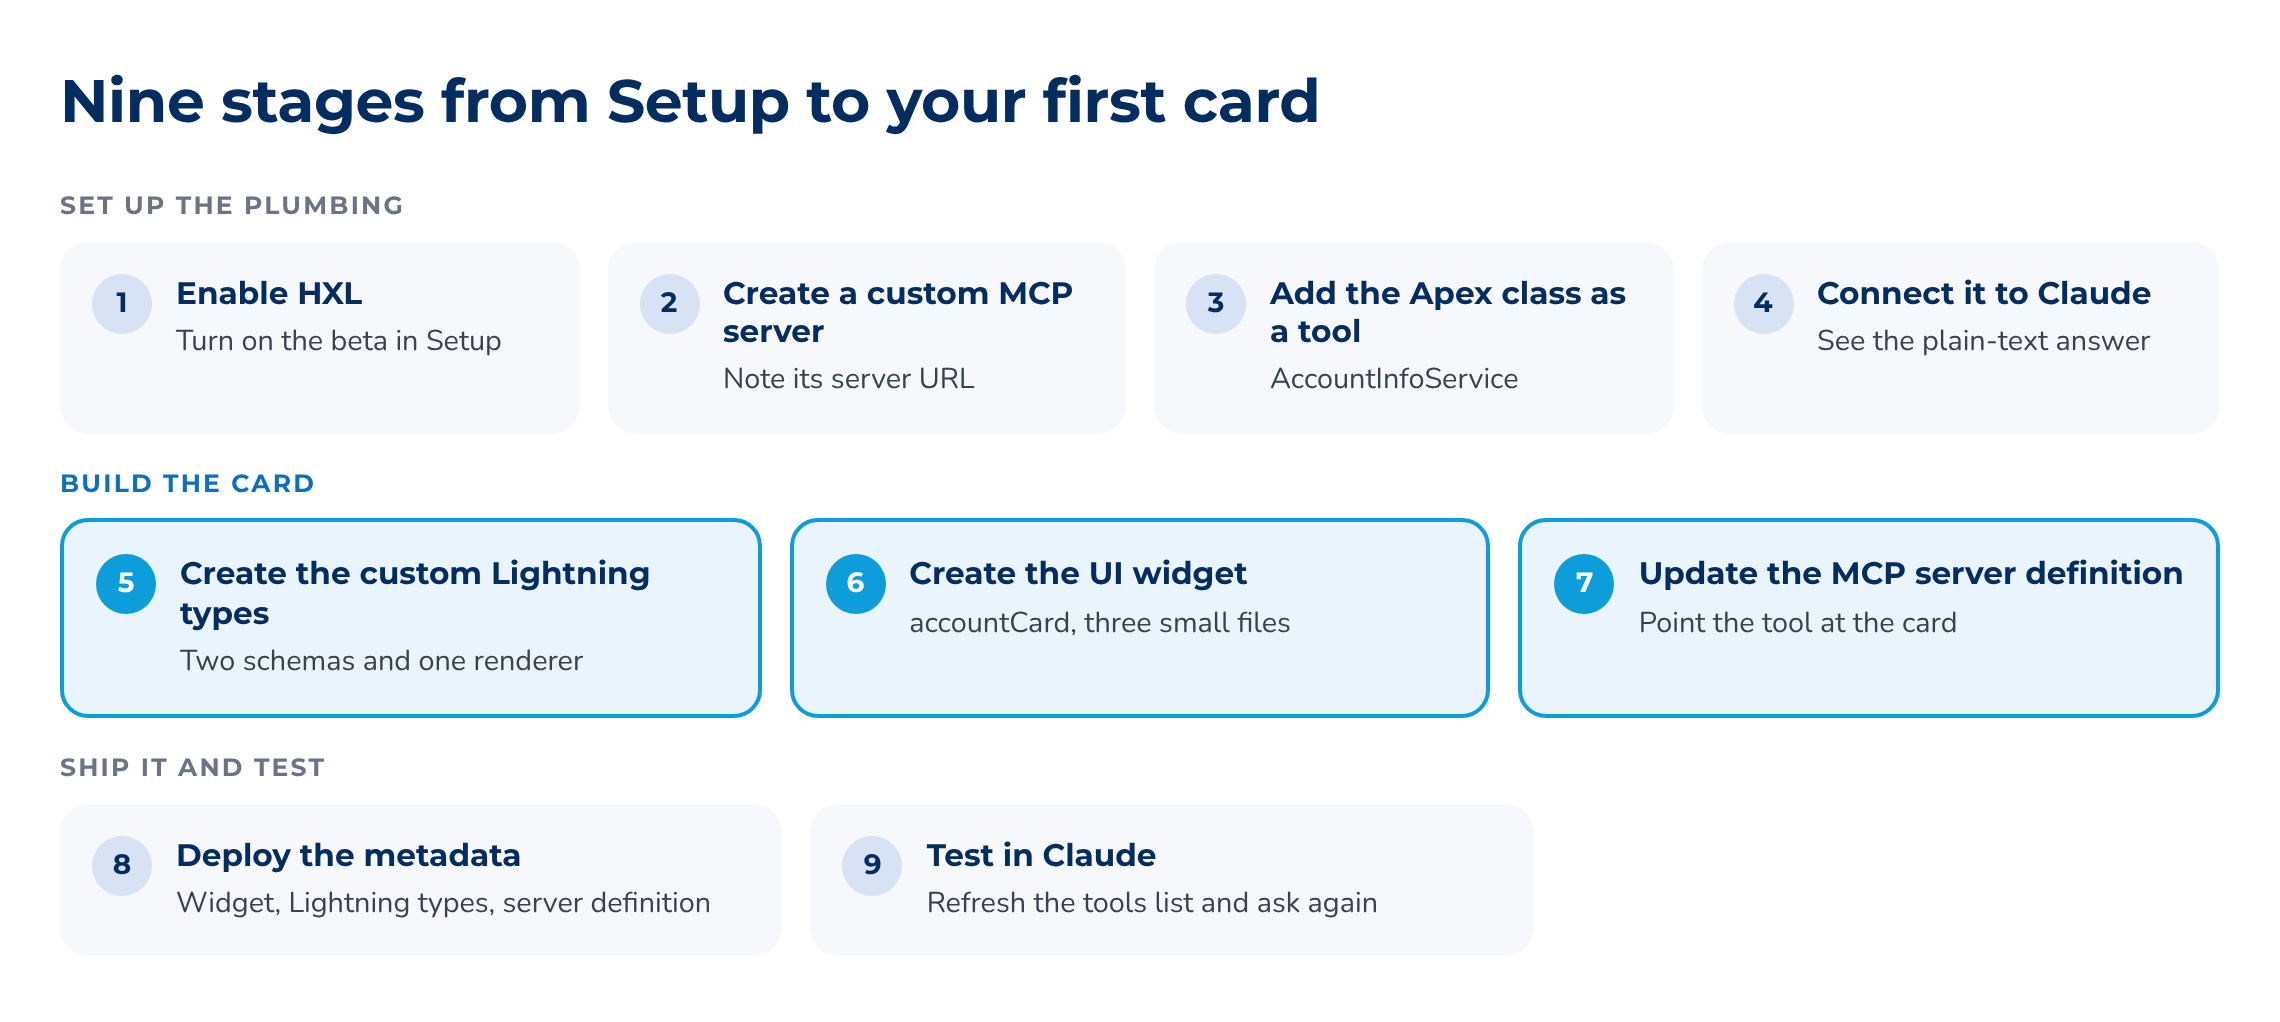
You'll need three things: a Developer Edition or sandbox org, VS Code with the Salesforce Extension Pack, and a Claude account that can add a custom connector. If VS Code isn't set up yet, the Step-by-Step Guide to Getting Started with Visual Studio Code for Salesforce gets you there.
Stage 4 reuses two sections of the custom MCP server guide, the External Client App setup and the Claude app setup, so keep that guide open in another tab.
This guide is a lesson in our Mastering AIforce course. All Access Pass members can download the PDF from the lesson and copy the code for every file.
Mastering AIforce takes you through MCP servers, Multi-Framework, Agentforce Coworker and now the Headless Experience Layer. If AIforce is new to you, start with the Introduction to AIforce lesson and work forward from there.